Award Winning Solutions
Xena has won multiple global awards for price/performance and technical innovation. Learn more.

Technical Expertise
Copyright © 2009-2024 Teledyne LeCroy Xena ApS, Denmark
Xena provides Vulcan VE software-based Ethernet traffic generators.
Functionally, they are identical to the Vulcan hardware-based products, and use the same Manager applications and CLI scripting syntax. The virtual editions however are deployed on customer hardware, currently requiring VMware.
Each deployed virtual machine has one test port. The VM images can be freely downloaded here, and installed on VMware. In order to run they require permission from the Xena license system which has a pool of freely available resources for short-term demo purposes.
Here are the system requirements for each edition:
| Version | CPUs | RAM |
|---|---|---|
| Vulcan VE 300 | 6 | 16 GB |
| Vulcan VE 500 | 8 | 24 GB |
| Vulcan VE 700 | 14 | 64 GB |
| Xena VE 100 | 2 | 3 GB |
INSTALL
Obtain a zip-file for your host platform and product type. The available choices can be seen in the table above.
The zip-file contains the necessary files to create a VM appliance containing the VE product.
Use the host environment to create a VM instance with default settings. No customization is required at the host level.
The VM has a virtual NIC for managing the VE product. It should be connected to the appropriate LAN and will use DHCP to obtain an IPv4 address to connect to.
Most VMs have a second virtual NIC for transmitting and receiving test traffic. It should be connected to the device under test (not the management LAN!).
For mlx5 appliances you should use PCI-passthrough to map an appropriate Nvidia NIC port into the VM for transmitting and receiving test traffic.
Then power-on the VM and proceed with Xena-specific setup.
Once the VM is powered-on, use the host environment to open a console on the VM and login with username ‘setup’ and no password. This brings you into the Xena VE – SETUP program:
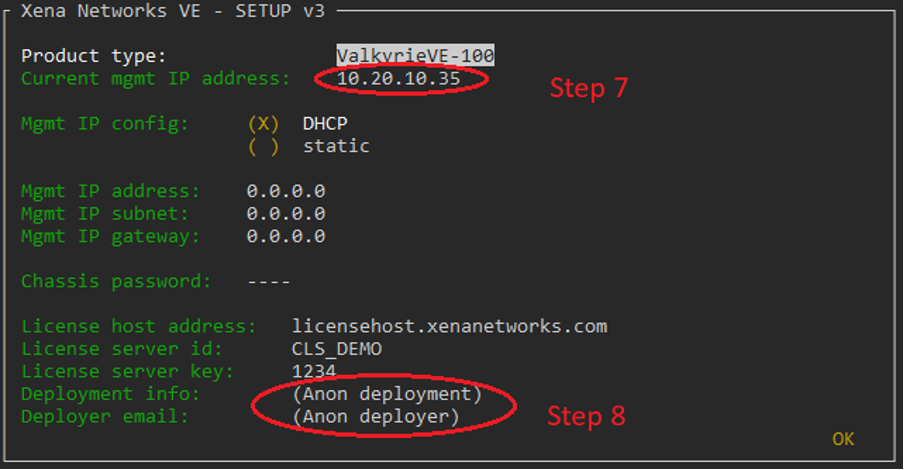
At the top you can see the management IP address obtained via DHCP. Make a note of this so you know how to connect from the Manager application. You also have the option to specify a static IP address.
You navigate the setup program using the arrow-keys, and press the OK button with the return-key to save and exit. You can terminate without saving by pressing Ctrl-C, but this first time you need to enter a few values. Your input is not validated, so double-check.
Xena’s VE products use a floating license system. By default they obtain permission to run from the public Xena License Host which has a license server called CLS_DEMO.
You should specify two pieces of information that will help identify this product instance to the license system:
Then navigate to the OK button and press the return-key, ending your console session.
HOW TO UPDATE
Xena frequently issues new software releases for the VE products, and the release contained in your deployment zip-file may have been superseded.
Again open a console on the VM and this time login with username ‘update’ and no password. This brings you into the Xena VE – UPDATE program:
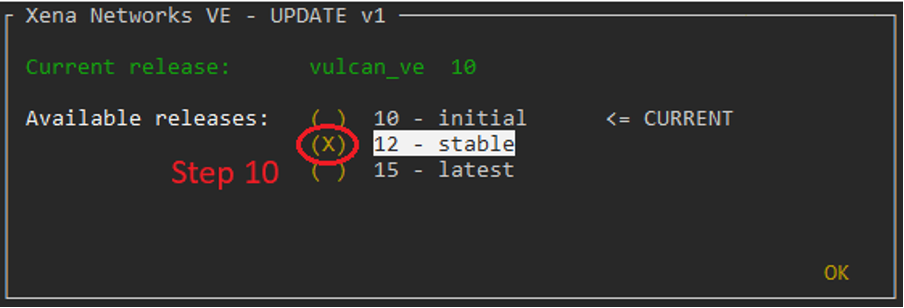
At the top you can see the release number currently installed in your VM.
Below you will see the list of releases currently available from the public Xena VE release repository. Look for a release tagged as ‘stable’, press the space-bar to select it, navigate to the OK button, and press the return-key. As in the setup program, you can press Ctrl-C to exit without doing any changes.
INSTALLATION CONCLUSION
This concludes deploying, setting up, and updating your VE product. It is now ready to use from a Manager application (TCP port 22606) and from scripting (TCP port 22611). The default password is ‘xena’.
You can always go back and use the setup program again. To change the management IP address, change the license server, or change the password.
Likewise you can run the update program regularly to check for new releases.
Both the setup-account and the update-account can be accessed remotely via ssh (secure shell) as soon as you know the IP address.
Running the setup and update programs will restart the VE product so remember to save your work first.
Xena has won multiple global awards for price/performance and technical innovation. Learn more.
Copyright © 2009-2024 Teledyne LeCroy Xena ApS, Denmark